How to choose Iceland locations for epic photo adventures
How to choose Iceland locations for epic photo adventures ! Photographer reviews images by rural Iceland roadside Choosing the right photography locations in Iceland can feel overwhelming.

Choosing the right photography locations in Iceland can feel overwhelming. With dramatic waterfalls, volcanic black sand beaches, glacial lagoons, and endless mountain ranges, the sheer variety of landscapes makes it hard to know where to start. Add unpredictable weather, seasonal accessibility challenges, and crowded tourist hotspots, and planning your photographic adventure becomes even more complex. This guide gives you a practical framework to select locations strategically, balance iconic sites with hidden gems, and time your shoots for maximum impact. You’ll learn how to research effectively, scout on-site, and adapt to conditions so you can capture images that reflect your unique vision and create meaningful travel memories.
Table of Contents
- Key takeaways
- Understanding your adventure and photography goals
- Preparing your tools and researching Iceland locations
- Mastering timing and on-site scouting for optimal shots
- Balancing iconic sights with hidden gems and managing seasonal considerations
- Explore Lucy Moments for expert Iceland photography guidance
- Frequently asked questions
Key Takeaways
| Point | Details |
|---|---|
| Extensive location research | Use maps and satellite views to identify landscapes and hidden gems before you travel. |
| Shoot during best light | Plan around golden hour blue hour and weather forecasts to maximize imagery. |
| Balance iconic and hidden gems | Combine well known landmarks with lesser visited spots to capture variety and reduce crowding. |
| Be flexible on site | Adjust plans according to weather and road conditions and access to locations. |
Understanding your adventure and photography goals
Before you dive into location research, clarify what you want from your Iceland photography adventure. Your personal interests, travel style, and logistical constraints will shape every decision you make. Some photographers chase the northern lights exclusively, while others focus on intimate landscape details or adventure portraits against epic backdrops. Understanding your priorities helps you allocate time and energy effectively.
Consider whether you prefer independent exploration or guided experiences. Adventure travelers should rent 4WD vehicles for flexibility over tours, plan 10 to 14 days minimum, and focus on regions like the South Coast or Snaefellsnes Peninsula. Guided tours offer local expertise and access to private locations, but limit spontaneity. Independent travel with a capable vehicle lets you chase light and weather conditions on your own schedule.
Think about trip length and regional focus. Iceland’s Ring Road spans roughly 830 miles, and trying to cover everything in a week leaves you exhausted and rushed. Concentrating on two or three regions allows deeper exploration and better photography. A how to plan Iceland photo tour approach helps you map out realistic daily distances and shooting windows.
Your season and weather preferences matter enormously. Summer offers midnight sun and accessible highlands but brings heavy crowds. Winter delivers ice caves and aurora potential but shorter days and road closures. Understanding these trade-offs early prevents disappointment and aligns your location choices with realistic expectations. Make a list separating must-see iconic sites from your desire for off-the-beaten-path discoveries, then prioritize based on your available time.
Key considerations for defining your goals:
- Identify your primary photography interests: sweeping landscapes, northern lights, ice formations, adventure portraits, or wildlife
- Determine your comfort level with driving on gravel roads, river crossings, and winter conditions
- Assess your physical fitness for hikes to remote viewpoints or multi-hour treks
- Decide how much time you can dedicate to single locations versus covering more ground
- Evaluate your budget for accommodations, vehicle rental, and potential guide services
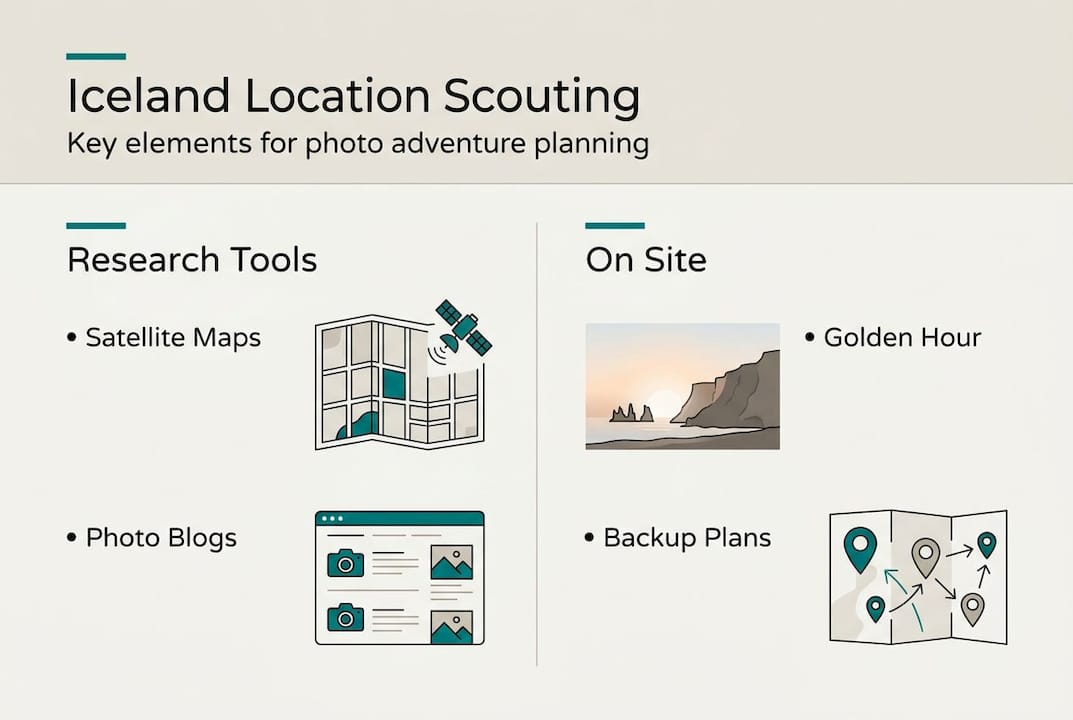
Preparing your tools and researching Iceland locations
Effective research transforms your trip from a generic tourist circuit into a personalized photographic journey. Start by using Google Maps’ satellite and topographic views to identify landscapes and hidden gems that match your vision. Zoom in on coastal areas to spot dramatic cliffs, scan highland regions for colorful geothermal zones, and trace rivers to find lesser-known waterfalls. Topographic layers reveal elevation changes that create interesting compositions.
Gather inspiration from established photographers’ portfolios, blogs, and Instagram accounts, but approach this strategically. Instagram-famous spots often overcrowded, and experts advocate satellite scouting for unique angles and compositions over replication, emphasizing personal vision. Study how photographers use foreground elements, leading lines, and light direction rather than simply copying their exact framing. This research phase helps you understand what’s possible while developing your own creative approach.
Seasonal timing dramatically affects your photography opportunities. Apps like PhotoPills and online sunrise-sunset calculators let you visualize sun and moon positions at specific locations throughout the year. Winter’s low sun creates long golden hours but limits shooting windows. Summer’s extended twilight offers flexibility but less dramatic directional light. Plan your itinerary around these constraints, scheduling your most important locations for optimal lighting conditions.
Prepare contingency plans for Iceland’s notoriously unpredictable weather. For every primary location on your list, identify two or three nearby alternatives that work under different conditions. If coastal winds make waterfall photography impossible, have an inland canyon or mountain location ready. This flexibility prevents wasted days and keeps you shooting regardless of conditions.
A comprehensive guide to location scouting Iceland teaches you how to evaluate potential sites systematically. Look beyond the obvious postcard views to find fresh perspectives that tell your story.
Pro Tip: Create a digital map with pins for primary locations, backup options, and interesting spots you discover during research. Color code by priority and weather requirements so you can make quick decisions on the road.
| Research Tool | Primary Use | Best For |
|---|---|---|
| Google Maps Satellite | Identifying landforms and access points | Finding hidden coastal features and highland patterns |
| PhotoPills | Sun/moon position planning | Timing golden hour and aurora shoots |
| Vedur.is | Icelandic weather forecasts | Real-time conditions and cloud cover predictions |
| Instagram/500px | Composition inspiration | Understanding popular angles and finding fresh approaches |
| Road.is | Road conditions and closures | Planning safe routes to remote locations |
Mastering timing and on-site scouting for optimal shots
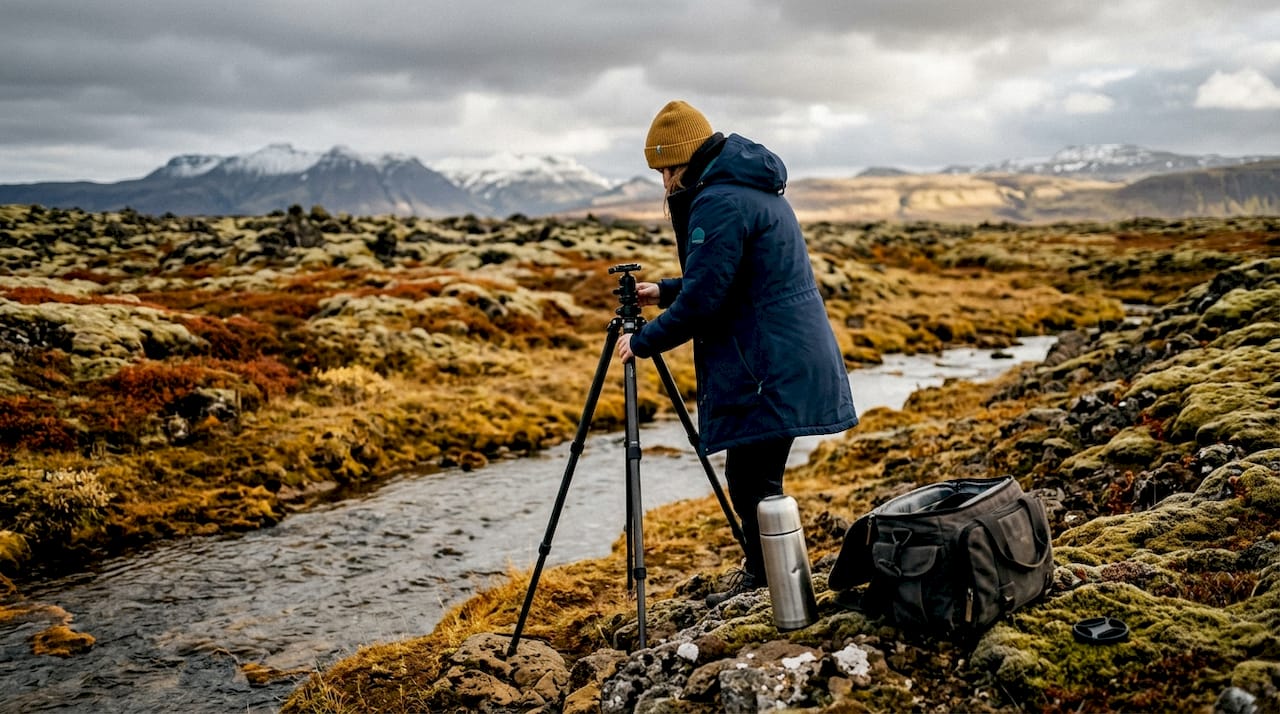
Even the most spectacular location delivers mediocre results without proper timing and composition. Prioritize golden hour and blue hour timing, checking light direction and weather forecasts on sites like vedur.is, and arrive one hour early to scout compositions with foreground elements like rocks or leading lines. This advance arrival gives you time to explore different angles, test compositions, and position yourself before the light peaks.
Golden hour, occurring shortly after sunrise and before sunset, provides soft, warm, directional light that adds depth and dimension to landscapes. Blue hour, the period of twilight before sunrise and after sunset, offers cool, even illumination perfect for long exposures of waterfalls and coastal scenes. In Iceland’s summer, these periods blend together during extended twilight, while winter compresses them into brief, intense windows.
Weather forecasting becomes a critical skill for Iceland photography. Vedur.is provides detailed regional forecasts including wind speed, precipitation, and cloud cover predictions. Learn to read these forecasts strategically. Partly cloudy conditions often produce the most dramatic skies, with breaks in clouds allowing shafts of light to illuminate landscapes. Completely clear skies can look flat and boring, while total overcast works beautifully for waterfalls and intimate details but kills distant vistas.
Aurora photography requires additional planning layers. Aurora frequency peaks at equinox months, with 27% higher chances, and being near dark sites with Kp index 2 to 3 increases success. Download aurora forecast apps that predict activity levels and cloud cover simultaneously. Even strong aurora forecasts mean nothing under cloudy skies, so prioritize locations with multiple escape routes to clearer conditions.
On-site scouting transforms good photos into exceptional ones. Walk the entire accessible area around your chosen location, looking for foreground elements that add depth and context. Volcanic rocks, ice chunks, wildflowers, or weathered driftwood can anchor your composition and guide viewers’ eyes through the frame. Leading lines from rivers, roads, or geological formations create natural pathways that enhance visual flow.
Steps for effective on-site scouting:
- Arrive at your location at least one hour before optimal light
- Walk a complete perimeter to identify all possible angles and compositions
- Test multiple foreground elements and their relationship to your main subject
- Use your camera’s viewfinder to preview compositions rather than relying on memory
- Mark your chosen position and return as light conditions improve
- Remain flexible to adjust if conditions change or better opportunities emerge
Pro Tip: Bring a headlamp with a red light mode for pre-dawn scouting. Red light preserves your night vision while letting you navigate safely and adjust camera settings without disturbing the natural darkness needed for aurora or twilight photography.
Develop a systematic approach to Iceland photography tips lens guide and technical execution. Understanding how different focal lengths interact with Iceland’s vast landscapes helps you make quick decisions when light conditions are fleeting.
Balancing iconic sights with hidden gems and managing seasonal considerations
Iconic locations like Skógafoss, Kirkjufell, and Jökulsárlón deliver breathtaking views that justify their fame, but they’re often crowded with photographers jockeying for the same classic angles. Early morning visits, typically before 7 AM even in summer, let you shoot these landmarks with minimal human presence. Off-season timing, particularly November and March, reduces crowds while maintaining reasonable weather and light conditions.
Balance iconic sites with hidden gems found via satellite imagery or local tips to avoid crowds and capture unique perspectives. Chat with accommodation hosts, gas station attendants, and locals you meet. Icelanders often know spectacular spots that never appear in guidebooks because they’re too remote, require local knowledge to access safely, or simply haven’t been discovered by the photography community yet.
Hidden gems offer creative freedom and solitude but require more research and risk assessment. Unmarked locations may lack clear parking, defined trails, or safety infrastructure. Always inform someone of your plans when visiting remote spots, carry emergency communication devices, and respect private property boundaries. The reward for this extra effort is imagery that stands apart from the thousands of identical shots flooding social media.
Seasonal considerations shape every aspect of your Iceland photography adventure. Optimal seasons include late winter, early spring, and autumn for light and fewer crowds, while summer offers midnight sun but heavy tourism, and winter delivers ice caves and auroras but road closures. Each season presents distinct advantages and challenges that align differently with various photographic goals.
Autumn, from September through October, provides balanced daylight hours, autumn colors in highland vegetation, and increasing aurora activity as nights lengthen. Crowds thin after summer’s peak, and most roads remain accessible. Late winter and early spring, February through April, offer growing daylight, potential for both auroras and blue hour landscapes, and access to ice caves before they melt. Summer grants 24-hour shooting flexibility and access to highland F-roads but brings midnight sun that eliminates true darkness and attracts massive tourist numbers.
| Location Type | Advantages | Challenges | Best Strategy |
|---|---|---|---|
| Iconic Sites | Proven compositions, easy access, dramatic features | Heavy crowds, overshot angles, parking competition | Visit at dawn, off-season, or during poor weather when others stay away |
| Hidden Gems | Solitude, unique perspectives, creative freedom | Difficult access, limited information, potential hazards | Research thoroughly, assess risks, inform others of plans |
| Season | Light Quality | Aurora Chances | Accessibility | Crowd Levels | Best For |
|---|---|---|---|---|---|
| Summer (June-August) | Midnight sun, minimal darkness | None | Full highland access | Very high | Highlands, waterfalls, extended shooting |
| Autumn (September-October) | Balanced hours, golden light | Increasing | Most roads open | Moderate | Balanced trips, autumn colors, early auroras |
| Winter (November-February) | Short days, long twilight | High | Limited, F-roads closed | Low | Ice caves, auroras, dramatic winter scenes |
| Spring (March-May) | Growing daylight | Decreasing | Improving gradually | Low to moderate | Late ice caves, fewer crowds, balanced light |
Tips for managing crowds and seasonal accessibility:
- Book accommodations near priority locations to enable pre-dawn departures
- Monitor road.is daily for real-time road conditions and closure updates
- Carry tire chains and know how to install them for winter travel
- Schedule flexible rest days to wait out poor weather or road closures
- Consider visiting popular spots during midday when light is poor but crowds are heaviest, then scout for your actual shoot
Explore diverse Iceland photography locations to see how different regions offer distinct characteristics and photographic opportunities throughout the year.
Explore Lucy Moments for expert Iceland photography guidance
Planning your Iceland photography adventure becomes easier with expert guidance tailored to your creative vision. Lucy Moments specializes in adventure and landscape photography throughout Iceland’s most stunning regions, helping travelers like you transform location research into meaningful photographic experiences. Whether you’re planning an independent journey or seeking personalized guidance, exploring the work of experienced Iceland photographers provides inspiration and practical insights.
Discover how professional approaches to about Iceland photographer Lucy Moments can enhance your own creative process. Review diverse Iceland photography portfolio examples to see how different seasons, lighting conditions, and compositional approaches create varied emotional impacts. Personalized advice and booking guidance help you design photo tours that match your skill level, interests, and available time, ensuring your Iceland adventure delivers the epic images and memories you’re seeking.
Frequently asked questions
How do I find less crowded photography locations in Iceland?
Use Google Maps satellite view to identify interesting landforms away from main roads, then cross-reference with road accessibility on road.is. Ask locals at your accommodations for their favorite spots, as Icelanders often know spectacular locations that haven’t reached tourist guides. Visit popular sites during off-hours or poor weather when crowds thin, and always have backup locations ready.
What is the best time of year to photograph the northern lights?
September through March offers the best aurora opportunities, with peak activity around the equinoxes in September and March. You need dark skies, so avoid summer’s midnight sun period. Monitor aurora forecasts for Kp index levels of 2 or higher, and prioritize locations away from light pollution with clear northern horizons.
Is renting a 4WD essential for accessing remote Iceland photo spots?
A 4WD vehicle is essential for F-road access to highlands and provides crucial safety on gravel roads and during winter conditions. Two-wheel drive works for Ring Road travel and paved routes, but limits you to the most accessible locations. If you want flexibility to chase weather and reach hidden gems, invest in a capable 4WD rental.
How should I prepare for unpredictable Icelandic weather?
Layer clothing using wool or synthetic base layers, insulating mid-layers, and waterproof outer shells. Check vedur.is multiple times daily and prepare backup locations for every primary shoot. Pack lens cloths and rain covers for your camera gear, and embrace changing conditions as opportunities for dramatic imagery rather than obstacles.
What camera gear works best for Iceland landscapes?
A wide-angle lens in the 16 to 35mm range captures expansive landscapes, while a 70 to 200mm lens isolates distant details and compresses mountain scenes. Bring a sturdy tripod for long exposures and low-light conditions, plus neutral density and polarizing filters. Weather-sealed bodies and lenses provide peace of mind in Iceland’s wet, windy conditions.